What is an Operating System?
- Intermediate between Hardware and Software applications
- Hides hardware complexity (Read/write file storage, send/receive socket network)
- Handles resource management (CPU scheduling, Memory management)
- Provide isolation and protection (allocate different parts of memory to different applications so that applications don’t overwrite other memory locations)
Operating System definition:
An Operating System is a layer of systems software that:
- directly has privileged access to the underlying hardware;
- hides the hardware complexity;
- manages hardware on behalf of one or more application according to some predefined policies.
- In addition, it ensures that applications are isolated and protected from one another.
OS Elements
- Abstractions (corresponds to applications that OS executes)
- process, thread, file, socket, memory page
- Mechanisms (on top of Abstractions)
- create, schedule, open, write, allocate
- Policies (how mechanisms are used to manage underlying hardware)
- Least Recently Used (LRU) , Earliest Deadline First (EDF), etc.
OS Design Principles
- Seperation of mechanism and policy
- implement flexible mechanisms to support many policies
- e.g. LRU, LFU, random
- Optimize for common case
- Where will the OS be used?
- What will the user want to execute on that machine?
- What are the workload requirements?
User/ Kernel Protection Boundary
- user-level => applications [underprivileged mode]
- kernel-level => OS Kernel [privileged access, hardware access]
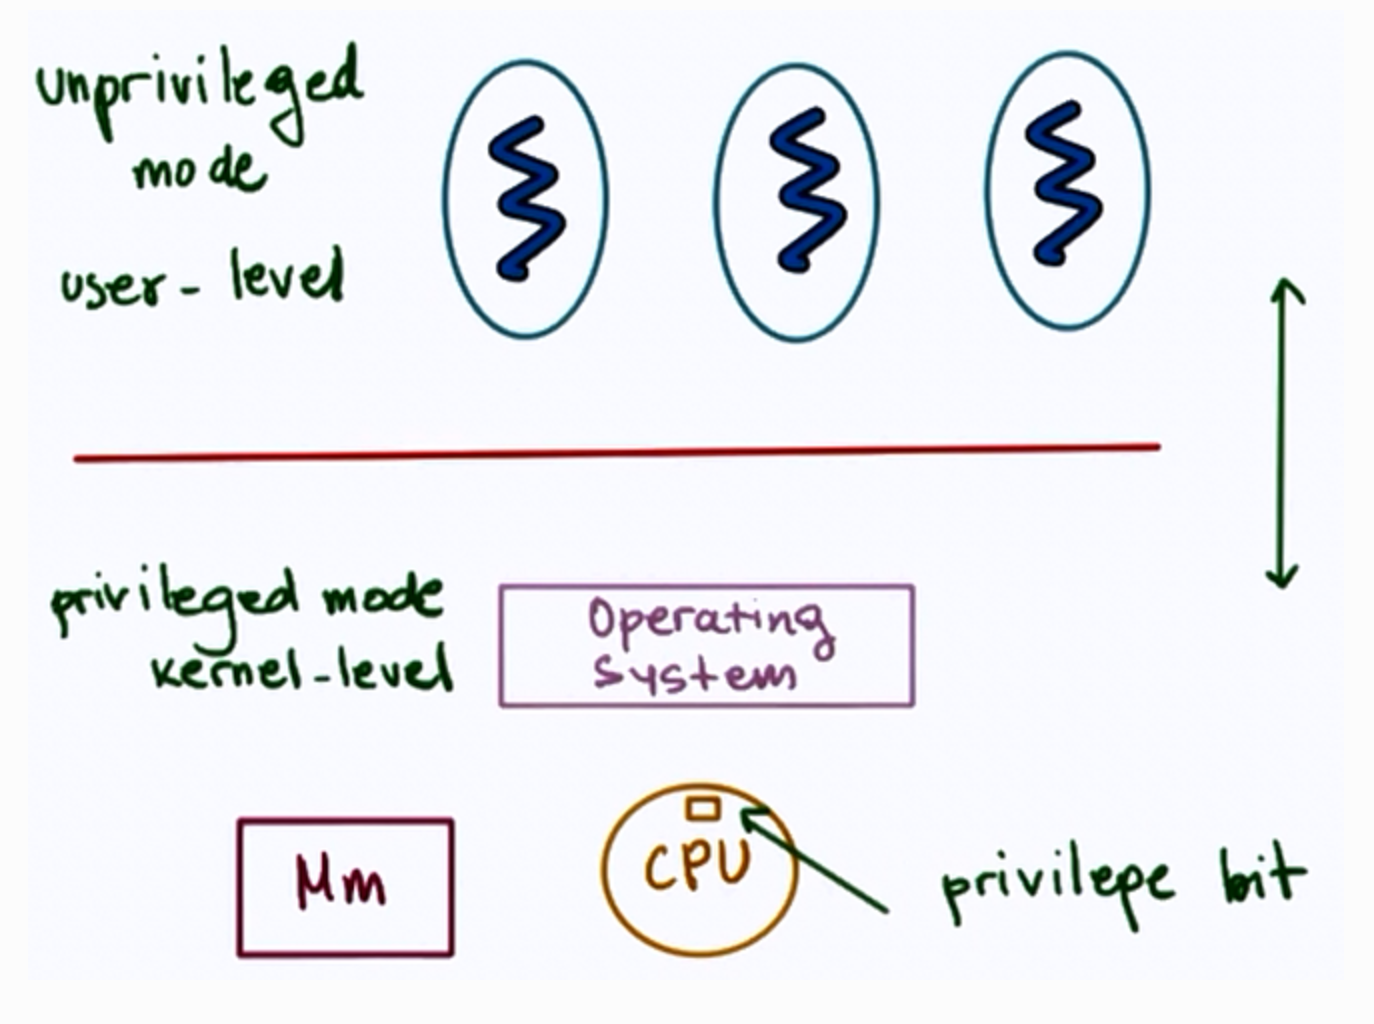
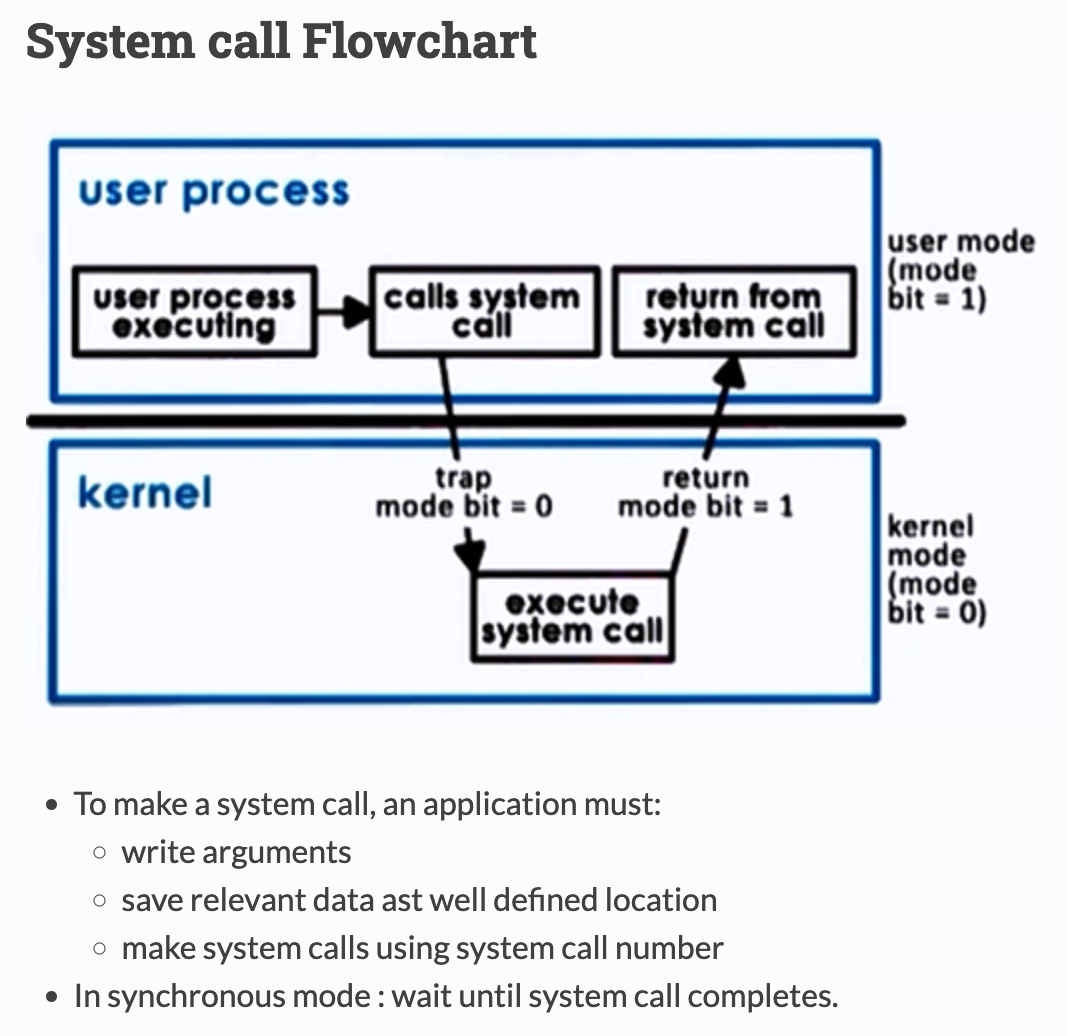
- User-Kernel switch is supported by hardware.
- using trap instructions
- system calls like:
- open (file)
- send (socket)
- malloc (memory)
- signals
Basic OS services
- process management
- file management
- device management
- memory management
- storage management
- security
Linux System Calls
| Task | Commands |
|---|---|
| Process Control | fork (); exit(); wait(); |
| File Manipulation | open(); read(); write(); |
| Device Manipulation | ioctl(); read(); write(); |
| Information Maintenance | getpid(); alarm(); sleep(); |
| Communication | pipe(); shmget(); mmap(); |
| Protection | chmod(); umask(); chown(); |
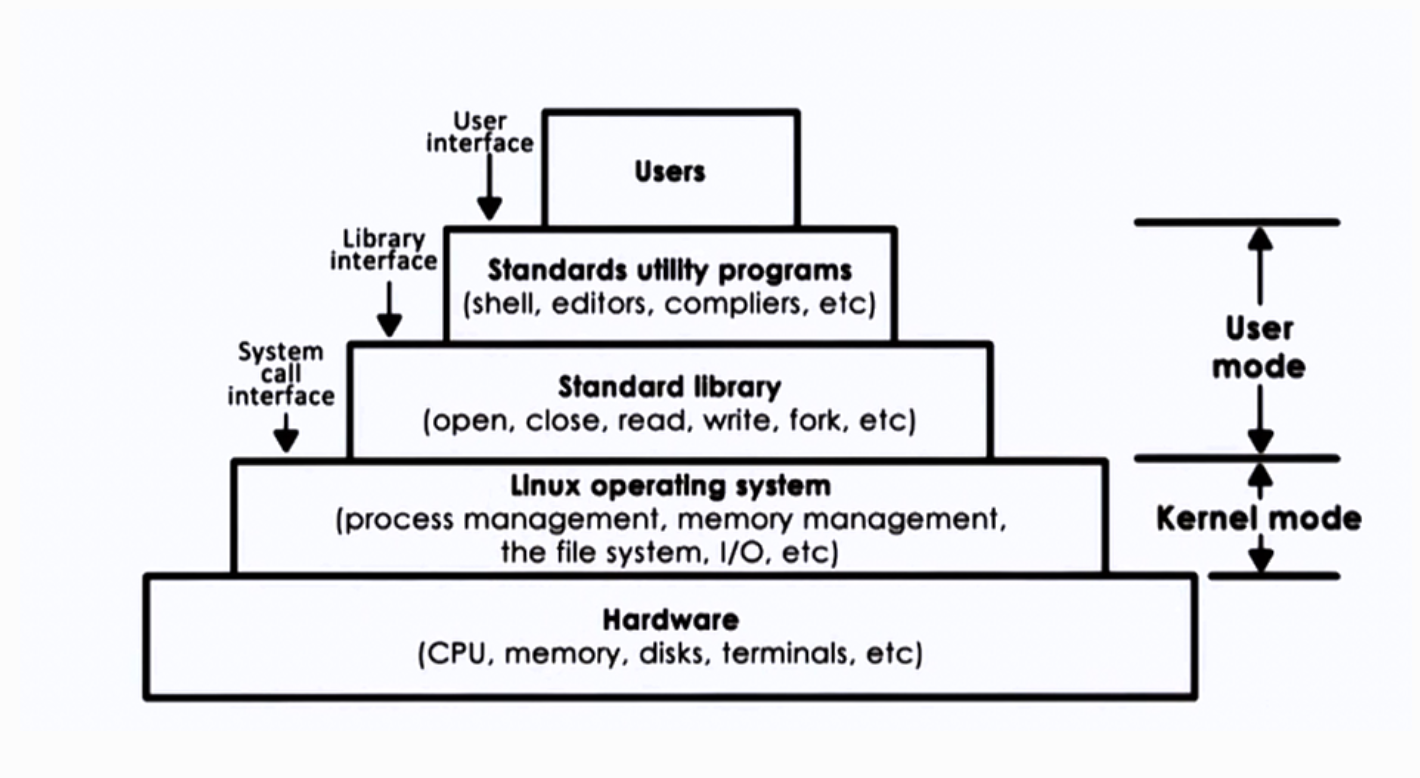
Linux Architecture
Inter Process Communication
- Processes share memory
- data in shared messages
- Processes exchange messages
- message passing via sockets
- Requires synchronization
- mutex, waiting
Inter Process Communication(IPC) is an OS supported mechanism for interaction among processes (coordination and communication)
- Message Passing
- e.g. sockets, pips, messages, queues
- Memory based IPC
- shared memory, memory mapped files
- Higher level semantics
- files, RPC
- Synchronization primitives
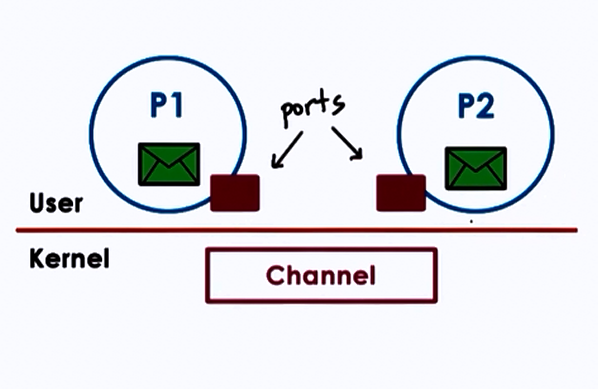
Message Passing
- Send/Receive messages
- OS creates and maintains a channel
- buffer, FIFO queue
- OS provides interfaces to processes
- a port
- processes send/write messages to this port
- processes receive/read messages from this port
- Kernel required to
- establish communication
- perform each IPC operation
- send: system call + data copy
- receive: system call + data copy
- Request-response: 4x user/ kernel crossings +
4x data copies
Forms of Message Passing IPC
1. Pipes
- Carry byte stream between 2 process
- e.g connect output from 1 process to input of another
2. Message queues
- Carry “messages” among processes
- OS management includes priorities, scheduling of message delivery
- APIs : Sys-V and POSIX
3. Sockets
- send() and recv() : pass message buffers
- socket() : create kernel level socket buffer
- associated necessary kernel processing (TCP-IP,..)
- If different machines, channel between processes and network devices
- If same machine, bypass full protocol stack
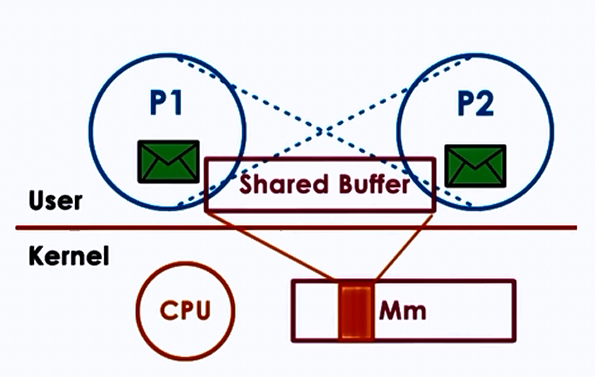
Shared Memory IPC
- read and write to shared memory region
- OS establishes shared channel between the processes
- physical pages mapped into virtual address space
- VA(P1) and VA(P2) map to same physical address
- VA(P1) != VA(P2)
- physical memory doesn’t need to be contiguous
- APIs : SysV, POSIX, memory mapped files, Android ashmem
Advantages
- System calls only for setup data copies potentially reduced (but not eliminated)
Disdvantages
- explicit synchronization
- communication protocol, shared buffer management
- programmer’s responsibility
Shared Memory and Synchronization
Use threads accessing shared state in a single addressing space, but for process
Synchronization method:
- mechanism supported by processing threading library (pthreads)
- OS supported IPC for sync
Either method must coordinate
- no of concurrent access to shared segment
- when data is available and ready for consumption
IPC Synchronization
| Message Queues | Semaphores |
|---|---|
| Implement “mutual exclusion” via send/receive | OS supported synchronization construct |
| binary construct (either allow process or not) | |
| Like mutex, if value = 0, stop; if value = 1, decrement(lock) and proceed |
JS: Concepts
What is “this” keyword?
In JavaScript, this refers to the object that the current function or method is operating on. In other words, this is a reference to the object that invoked the function or method.
Consider the following code:
let obj = {
  name: "My Object",
  logName: function() {
    console.log(this.name);
  }
};

obj.logName(); // Output: "My Object"
The logName function is a method of the obj object. When we call obj.logName(), this inside the function refers to obj. Therefore, this.name is equivalent to obj.name, and the output is "My Object".
Global Context
When we invoke a standalone function, this refers to the global object (window in the browser and global in Node.js). For example:
var message = "Global";

function showMessage() {
  console.log(this.message);
}

showMessage(); // Output: "Global"
JS: Global & Function Scope
A variable declared outside of any function or block is considered to be in the global scope. These variables are accessible from anywhere in the code, including inside functions.
let globalVariable = "I'm accessible from anywhere!";

function myFunction() {
  console.log(globalVariable); // Output: "I'm accessible from anywhere!"
}
On the other hand, a variable declared inside a function is only accessible within that function’s scope. These variables are also referred to as local.
function myFunction() {
  let localVariable = "I'm only accessible within myFunction";
}
console.log(localVariable); // ReferenceError: localVariable is not defined
It’s also possible to declare a variable without using the var, let, and const. These variables are considered global but they can produce unexpected behavior as we’ll explain later on.
function myFunction() {
  noKeywordVariable = "I'm a global variable";
}
console.log(noKeywordVariable); // Output: "I'm a global variable"
JS: Block Scope
In JavaScript, a block is defined as a piece of code surrounded by curly braces {}. Variables declared with the let and const keywords within a block are only accessible within that block and are referred to as block-scoped variables. The feature was introduced in ECMAScript 6 (ES6)
if (true) {
  let blockScopedVariable = "I'm only accessible within this block";
}
console.log(blockScopedVariable); // ReferenceError: blockScopedVariable is not defined
When we use variables declared with the var keyword within a block, they are still considered to be in the global or function scope.
if (true) {
  var notBlockScopedVariable = "I'm not block scoped";
}
console.log(notBlockScopedVariable); // Output: "I'm not block scoped"
Best Practices
- Always use
letorconstto declare variables instead ofvar. - Try to avoid using global variables as much as possible. Instead, use local variables declared within functions.
- Variable shadowing: It occurs when a variable declared within a function or block has the same name as a variable in an outer scope.
- Always use curly braces
{}to define blocks, even if there is only one statement.
What are Modules in JavaScript?
Modules in JavaScript are a way to organize code into reusable, independent units. They allow developers to keep code organized, maintainable and modular, making it easier to share and reuse code between different parts of an application.
Why Use Modules?
- Code Organization
- Code Reuse
- Reduced Global Scope Pollution
Creating Modules in JavaScript: CommonJS
// myModule.js
const myFunction = () => {
  console.log("Hello from my module!");
};

module.exports = myFunction;
To import the module in another file, you can use the require function:
// index.js
const myModule = require('./myModule');
myModule(); // Output: "Hello from my module!"
Creating Modules in JavaScript: ECMAScript Modules (ESM)
ESM is a more recent way to create modules in JavaScript, and it’s the standard supported by modern browsers and JavaScript tools. To create a module using ESM, you need to use the export keyword.
// myModule.js
export const myFunction = () => {
  console.log("Hello from my module!");
};
Then, we can import the module in another file like so:
// index.js
import { myFunction } from './myModule';
myFunction(); // Output: "Hello from my module!"
Asynchronous Module Definition
Require.js was the first library that originally implemented AMD as a module system. We can recognize the basic syntax by noticing the define function.
In module-a.js we define moduleA. We can import and use this module in module-b.js with the require function.
// module-a.js
define('moduleA', function() {
  return { message: 'Hello from module A' };
});

// module-b.js
require(['moduleA'], function(moduleA) {
  console.log(moduleA.message); // Hello from module A
});
How and Why are Module Bundlers Used?
Module bundlers are used to improve code performance by reducing the number of requests made to a server when a webpage is loaded. By bundling the various files that make up a project into a single file, the number of requests made is largely reduced.
What are Module Bundlers used for?
- Transpiling, minifying, and optimizing code to improve performance.
- Resolving naming conflicts and removing unused code via tree shaking.
- Enabling the use of new JavaScript features, even if the targeted browser does not yet support them.
- Providing a development environment with features such as live reloading and hot module replacement for faster development iterations.
- Supporting the use of modern JavaScript features such as ES modules and JSX.
- Enabling the creation of libraries and frameworks that can be easily distributed and used in other projects.
Popular Module Bundlers
- Webpack
- Esbuild
- Rollup
- Parcel
- Vite
Module Bundlers: Naming Conflicts
Module bundlers can potentially introduce naming conflicts. They occur when two or more modules use the same variable or function name. These conflicts can cause unexpected behavior and errors in your code. To resolve these conflicts, you can use a technique called “tree shaking”, which is a way of removing unused code from the final bundle. Many module bundlers support the use of namespaces or scoping to reduce the chance of naming conflicts.
What are Polyfills?
Polyfills are code snippets that provide missing functionality to older web browsers. They spawned similarly to AJAX, as the need for something new and advanced was already there. With polyfills, developers could write code that uses the latest web standards while addressing the missing functionalities.
What are transpilers?
A transpiler is a source-to-source compiler that converts code written in one programming language into another while preserving the original code’s functionality.
How Transpilers Work
At a high level, transpilers work by parsing the source code, analyzing its syntax, and then generating equivalent code in the target language. Naturally, the process follows a set of predefined rules and algorithms.
For example, let’s take a glance at this ES6 code:
const add = (a, b) => a + b;
console.log(add(2, 3));
A JavaScript transpiler, such as Babel, would convert this code into equivalent code that can run in environments that only support ES5 or earlier versions of JavaScript:
var add = function(a, b) {
  return a + b;
};
console.log(add(2, 3));
Here, the ES6 arrow function syntax was converted into a traditional function expression, making it compatible with older environments.
Transpilers: Key Takeaways:
- Note that transpilation is distinct from compilation, which converts code into a machine-readable format for execution.
- Transpilation allows you to use modern and cutting-edge code features in older environments by converting code written in one language into another.
- Babel, one of the most popular JavaScript transpilers, achieves this by breaking down code into a structured representation (parsing) and then converting it into code that can be understood by older environments (transformation).
- By utilizing a transpiler, you can improve the compatibility and performance of your code, allowing you to take advantage of new and evolving language features.
What are APIs?
APIs enable different applications to communicate with each other, exchanging both data and functionality. A good example of this is a stock market app that accesses real-time stock prices by “speaking” to a financial data provider.
What is Async?
Asynchronous programming is a technique that allows a program to continue executing other tasks while waiting for a particular task to complete. This can be especially useful in JavaScript, where a single-threaded execution model can lead to a blocked execution and a frozen UI if a long-running task is not handled properly.
JS: Synchronicity and Synchronous Functions
Synchronous code, also known as blocking code, is executed one line at a time in the order it is written. This means that the program will wait for a synchronous function to complete before moving on to the next line of code. For example, the following synchronous code will log "Fetching Data" and then "Data fetched" to the console:
console.log("Fetching Data...");
let data = fetchData();
console.log("Data fetched: " + data);
The program will wait for the fetchData() function to complete before moving on to the next line of code. Potentially, this can cause problems when the fetchData() function takes a long time to execute, as it will block the execution of any other functions that are waiting to be called.
JS: The Call Stack
The call stack is a data structure that keeps track of the execution of a program. It is a Last In, First Out (LIFO) data structure where the most recent function call is placed on top of the stack and the first function call is at the bottom. Each time a function is called, it is pushed onto the call stack and when the function returns, it is popped off the call stack.
In JavaScript, the call stack is single-threaded, which means that only one function can be executed at a time. This can cause problems when a function takes a long time to execute, as it will block the execution of any other functions that are waiting to be called, leading to potential errors.
console.log("Start");
function first(){
    console.log("Inside first function");
    second();
    console.log("Exiting first function");
}

function second(){
    console.log("Inside second function");
}

first();
console.log("End");
The call stack execution will look like this:
first()
second()
As we can see, the first function calls the second function, and the second function is pushed on top of the call stack, after the second function finishes it pops off, and the first function continues its execution. The final output will be:
"Start"
"Inside first function"
"Inside second function"
"Exiting first function"
"End"
JS: Asynchronous JavaScript
JavaScript achieves asynchronicity through the use of callback functions, promises, and other mechanisms such as the event loop and the web API.
A simple example of asynchronous code in JavaScript is the setTimeout() function, which allows you to execute a function after a certain amount of time.
setTimeout(() => {
    console.log("Executed after 2 seconds");
}, 2000);
console.log("Executed immediately");
As you can see, the setTimeout() function is called asynchronously. It doesn’t block the execution of the rest of the code, and the second console.log is executed immediately.
Promises as an Alternative to Callbacks in ES6
Asynchronous JavaScript has evolved a lot, and ES6 introduced a new way of handling asynchronicity through the use of promises. A promise is an object that represents the eventual completion of an asynchronous operation. Promises can be in one of three states: pending, fulfilled, or rejected. A promise can be used to handle callbacks in a more readable and maintainable way.
let promise = fetchData();
promise.then((data) => {
  console.log("Data fetched: " + data);
  let result = performCalculations(data);
  console.log("Calculations completed: " + result);
});
console.log("Fetching Data...");
The fetchData() function returns a promise that is pending. The promise is then fulfilled when the data is fetched, and the then() method is called, allowing the program to perform the calculations on the data.
They also have a catch() method that allows you to handle errors and a finally() method that allows you to run code after the promise has been resolved or rejected.
JS: AJAX – How it works?
What is AJAX?
AJAX as a technique, allows a web page to update itself without requiring a full page reload. Furthermore, this is achieved by requesting the server for new data and then updating the page with that data without refreshing it.
The Technology Bundle Used with AJAX
- HTML/XHTML and CSS: used to create the structure and layout of the web page.
- DOM (Document Object Model): used to access and manipulate the elements of the web page.
- XML or JSON: used to transfer data between the server and the client.
- XMLHttpRequest: This JavaScript object is used to make requests to the server and receive responses.
- JavaScript: used to handle the requests and update the page with the new data.
Here’s an example of a simple AJAX request:
var xhr = new XMLHttpRequest();
xhr.open('GET', '/data', true);
xhr.onreadystatechange = function() {
    if (xhr.readyState === 4 && xhr.status === 200) {
        console.log(xhr.responseText);
    }
};
xhr.send();
We create a new XMLHttpRequest object, and open a connection to the server using the 'GET' method and the URL '/data'. Then, we set the “onreadystatechange” event to handle the response. Once the request is sent, the server will respond with the requested data, which we can then use to update the page.
JS: Fetch API – Future of JS AJAX
In recent years, new APIs were introduced to replace the XMLHttpRequest object. The most popular of them is the Fetch API, which provides a simpler, more modern way to make network requests. The Fetch API uses promises to handle requests and responses and can be used in place of the XMLHttpRequest in most cases.
Observe the following example of how to make a request using the Fetch API:
fetch('/data')
    .then(response => response.json())
    .then(data => {
        console.log(data);
    });
Points to remember:
- AJAX is not a technology, but a method of using several different technologies together.
- The technologies used with AJAX include HTML/XHTML, CSS, DOM, XML, JSON, and JavaScript.
- Requests are handled using the XMLHttpRequest object or the Fetch API
- JSON is a common option for data transfer in AJAX applications
- AJAX can be used with various frameworks and libraries to make development easier.
JS: Async & Await – Modern way to handle promises
he async keyword is used to define an asynchronous function that returns a promise, allowing us to use the await keyword inside the function. The await keyword “waits” for a promise to be resolved before moving on to the next line of code. Here’s an example of an asynchronous function that returns a resolved promise after a delay using setTimeout:
async function delayedLog() {
  await new Promise((resolve) => setTimeout(resolve, 1000));
  console.log("1 second has passed");
}
delayedLog();
Things to remember:
- Async/await is a powerful tool for handling asynchronous code, making it more readable and maintainable.
- The technique is built on top of Promises, so understanding promises is a must.
- Always use try-catch to handle errors and avoid chaining multiple await statements.
- Async/await is suitable for handling promises,
setTimeout, orfetchAPI, but not for synchronous code. - Async/await can be slower than Promises, especially when used in tight loops or when the promise is already resolved, so it’s important to optimize its usage.
- The technique isn’t a silver bullet and its usage must be optimized and weighed based on the specific use case.
- Mastering it takes time and practice, but it can be a game-changer when it comes to making your code more readable and maintainable.
JS: Promises
Promises are a powerful feature introduced in ES6 that allows developers to handle asynchronous code elegantly and improve readability.
Basic Syntax
Promises are created using the Promise constructor. The constructor takes a single argument, a function called the executor, which is invoked immediately when the promise is created. The executor function takes two arguments, a resolve function, and a reject function, which are used to signal the completion or failure of the asynchronous operation.
const promise = new Promise((resolve, reject) => {
  // Asynchronous operation
  if (success) {
    resolve(result);
  } else {
    reject(error);
  }
});
Once a promise is created, it can be in one of three states:
- pending: The initial state, the promise is neither fulfilled nor rejected.
- fulfilled: The promise has been completed successfully and the result is available.
- rejected: The promise has failed and an error is available.
JS: Maps & Sets
Maps: JS way
JavaScript Maps were introduced in ECMAScript 6 (ES6) as a new data structure for storing key-value pairs. Maps provide a way to store keys of any data type, making them incredibly flexible and useful in a wide range of applications.
| Method | Description |
|---|---|
get() | Returns a specific element in reference to the key. If the key isn’t present in the Map it outputs undefined |
set() | Stores the value for keys in a Map |
has() | Returns a boolean value true if the key exists in the Map |
delete() | Removes an element of a Map specified by the key |
clear() | Removes all of the existing contents from a Map |
| Property | Description |
|---|---|
map.size | The size property returns the current number of elements in a Map |
Now, let’s create a new instance of the Map constructor and see how it works practically.
const myMap = new Map();

Then, we can add key-value pairs to our newly created Map using the set() method:

myMap.set("key1", "value1");
myMap.set("key2", "value2");

myMap.clear()
myMap.size //Output 0
Sets: Js way
Much like Maps, JavaScript Sets are a new data structure introduced in ES6. They give us a flexible approach to storing unique values of any type and have several intriguing use cases. Unlike arrays, sets don’t have indices, but their values can still be accessed and manipulated using various methods and properties.
The Difference between Sets and Maps
In contrast to Maps, which have keyed values, a Set is a special type of collection – a “set of values” (without keys) – where each value can occur only once. That’s exactly why the usual definitions stress the importance of “unique”.
Initially, we can create a Set object with the new Set() constructor. Then, we can leverage numerous methods to change the contents inside its collection.
| Methods | Description |
|---|---|
add() | Add a specified value into the Set |
clear() | Removes all elements from the Set object |
delete() | Deletes an element specified by the value |
has() | Returns true if an element with a given value is in the Set, false if otherwise |
| Property | Description |
|---|---|
set.size | The element count in the Set |
let set = new Set([1, 2, 3, 4, 5]);

set.add(6); // adds the value 6 to the set
console.log(set); // Set {1, 2, 3, 4, 5, 6}

set.clear(); // removes all elements from the set
console.log(set); // Set {} {size: 0}

set.add(1);
set.add(2);
set.add(3);
set.delete(2); // deletes the element with the value 2
console.log(set); // Set(2) {1, 3}

console.log(set.has(1)); // true
console.log(set.has(2)); // false
JavaScript Sets and Iteration
let set = new Set(["red", "green", "blue"]);

for (let value of set) {
  console.log(value);
  //Output:
  // red
  // green
  // blue
}

// the same with forEach:
set.forEach((value) => {
  console.log(value);
});
JS: Classes
Before ES6, JavaScript had no concept of classes. To mimic a class, you often use the constructor/prototype pattern as shown in the following example:
function Person(name) {
    this.name = name;
}

Person.prototype.getName = function () {
    return this.name;
};

var john = new Person("John Doe");
console.log(john.getName());
ES6 class declaration
ES6 introduced a new syntax for declaring a class as shown in this example:
class Person {
    constructor(name) {
        this.name = name;
    }
    getName() {
        return this.name;
    }
}

let john = new Person("John Doe");
objectName.methodName(args)

let name = john.getName();
This Person class behaves like the Person type in the previous example. However, instead of using a constructor/prototype pattern, it uses the class keyword.
JS: Class vs Custom type
Despite the similarities between a class and a custom type defined via a constructor function, there are some important differences.
First, class declarations are not hoisted like function declarations.
For example, if you place the following code above the Person class declaration section, you will get a ReferenceError.
let john = new Person("John Doe");Error:
Uncaught ReferenceError: Person is not definedCode language: JavaScript (javascript)Second, all the code inside a class automatically executes in the strict mode. And you cannot change this behavior.
Third, class methods are non-enumerable. If you use a constructor/prototype pattern, you have to use the Object.defineProperty() method to make a property non-enumerable.
Finally, calling the class constructor without the new operator will result in an error as shown in the following example.
let john = Person("John Doe");Error:
Uncaught TypeError: Class constructor Person cannot be invoked without 'new'PHP: Custom AutoLoaders
Autoloading is a technique in PHP that allows you to automatically include the necessary class files without having to use multiple require or include statements. This not only keeps your code clean but also enhances maintainability. While PHP provides a simple autoloading mechanism, creating a custom autoloader can give you more control and flexibility.
Why Use Autoloaders?
- Cleaner Code: Avoids multiple
requireorincludestatements. - Lazy Loading: Loads classes only when needed.
- Namespace Compatibility: Simplifies working with namespaces.
Registering an Autoloader
PHP provides the spl_autoload_register function to register your autoload function. This function can take a single function name or an array of class and method.
Basic Example
Let’s start with a basic example to understand how custom autoloaders work.
Directory Structure
/project
├── autoload.php
├── app
│ ├── Foo.php
│ └── Bar.php
└── public
      └── index.php
Create autoload.php
<?php
  function autoload($class) {
    $directories = [
        __DIR__.'/app/',
        // Add more directories here if needed
    ];

    foreach ($directories as $directory) {

        $file = $directory .  str_replace('\\', '/', $class) . '.php';
        if (file_exists($file)) {
            include $file;
            return;
        }
    }

}
spl_autoload_register('autoload');
This should autoload all the php files from app folder, additionally we can add more directories to list.
.htaccess file
add rewrites& redirects to file for router.
RewriteEngine on
RewriteCond %{REQUEST_FILENAME} !-f
RewriteCond %{REQUEST_FILENAME} !-d
RewriteRule ^(.*)$ /index.php?path=$1 [NC,L,QSA]
Create routerLoader.php,
<?php
namespace App;

	final class RouterLoader {
		private $route_name;
		private $route_method;
		private   $registered_routes = [
			"GET" => [],
			"POST" => []
		];

		public function __construct($setting){
			$settings = $setting->load_vars();
			$this->route_name = $settings['page_slug'];
			$this->route_method = $settings['method'];

		}
		public function check_route($uri,  $method = "GET"){
			if(!empty($this->registered_routes[$method][$uri])){
				return true;
			}else {
				return false;
			}

		}
		public function add_route($uri, $controller, $action, $method = "GET"){
			$this->registered_routes[$method][$uri] = ['controller' => $controller, 'action' => $action];
		}
		public function get_routes(){
			return ($this->registered_routes);
		}

		public function load_routes(){
			$uri = $this->route_name;
			$method = $this->route_method;
			if (array_key_exists($uri, $this->registered_routes[$method])) {
				$controller = $this->registered_routes[$method][$uri]['controller'];
				$action = $this->registered_routes[$method][$uri]['action'];

				$controller = new $controller();
				$controller->$action();
			} else {
				throw new \Exception("No route found for URI: $uri");
			}
		}
	}


	?>
We will also add a wrapper for router for easier access,
route.php
<?php

namespace App;

class Route {
	public static function GET($uri, $controller, $action){
		if($GLOBALS["router"]->check_route($uri)){
			throw new \Exception("Route Already Exists");
		}

		$GLOBALS["router"]->add_route($uri, $controller, $action);
	}
	public static function POST($uri, $controller, $action){
		if($GLOBALS["router"]->check_route($uri, "POST")){
			throw new \Exception("Route Already Exists");
		}
		$GLOBALS["router"]->add_route($uri, $controller, $action, "POST");
	}
}
We can now implement a controller & we can then render views using it.
Controller.php
<?php

namespace App;

class Controller
{
    protected static function render($view, $data = [])
    {
        include __DIR__."/../views/$view.php";
    }
}
?>
Now we will create a simple HomeController to test,
HomeController.php
<?php
namespace Controllers;

use App\Controller;


class HomeController extends Controller
{
    public function index()
    {
        $this->render('home');
    }
}
Now, we will also create an index.php file inside views folder and place sample text in it.
Now, We can finally create a web.php file to create routes than then load them into index.php file inside public dir.
web.php
<?php

use Controllers\HomeController;
use App\Route;

Route::GET("/", HomeController::class, 'index');

?>
Inside autoloader.php, add following code
// prev code above
use App\Setting;
use App\RouterLoader;

$settings = new Setting();
$router = new RouterLoader($settings);
Inside public/index.php, we will load the routes as follows.
<?php
require_once  __DIR__.'/../autoload.php';
require __DIR__.'/../src/routes/web.php';
$data = $router->load_routes();
?>
Now you can go to “localhost” and see the sample text, and we can also add additional routes using web.php & controller.
Thank you for reading…
~ Leaveitblank (Mayank Tripathi)